
Updated on 四月 25, 2019
PostgreSQL建立索引相关记录
主键、unique自动建立索引,无需额外创建索引
添加btree索引
create index index_tsbe_feedback_fb_type on tsbe_feedback using btree (fb_type)
查看某表的所有索引
select
A.SCHEMANAME,
A.TABLENAME,
A.INDEXNAME,
A.TABLESPACE,
A.INDEXDEF,
B.AMNAME,
C.INDEXRELID,
C.INDNATTS,
C.INDISUNIQUE,
C.INDISPRIMARY,
C.INDISCLUSTERED,
D.DESCRIPTION
from
PG_AM B left join PG_CLASS F on
B.OID = F.RELAM left join PG_STAT_ALL_INDEXES E on
F.OID = E.INDEXRELID left join PG_INDEX C on
E.INDEXRELID = C.INDEXRELID left outer join PG_DESCRIPTION D on
C.INDEXRELID = D.OBJOID,
PG_INDEXES A
where
A.SCHEMANAME = E.SCHEMANAME
and A.TABLENAME = E.RELNAME
and A.INDEXNAME = E.INDEXRELNAME
and E.SCHEMANAME = 'tsbe'
and E.RELNAME = 'tsbe_feedback';
或
select * from pg_indexes where tablename='tsbe_feedback'
删除索引
DROP INDEX index_tsbe_feedback_read_record_for_user;
Updated on 四月 25, 2019
近几天Android开发遇到的问题
个别机型崩溃报Unable to instantiate application java.lang.RuntimeException: MultiDex installation failed
使用multidex后,个别机型报crash报如上错误。尝试将compile ‘com.android.support:multidex:x.x.x’版本由1.0.3降为1.0.1,暂时修复此问题
Android P http访问连接失败问题
程序运行在Android P上时,无法访问网络。原因是Google针对下一代 Android 系统(Android P) 的应用程序,将要求默认使用加密连接,这意味着 Android P 将禁止 App 使用所有未加密的连接。解决办法最简单的是将targetSdkVersion降到27以下。
但这貌似不是最佳方案,参见:https://stackoverflow.com/questions/45940861/android-8-cleartext-http-traffic-not-permitted
Android P弹窗Detected problems with API compatibility(visit g.co/dev/appcompat for more info)
        if (Build.VERSION.SDK_INT >= Build.VERSION_CODES.P) {
            closeAndroidPDialog();
        }


    private void closeAndroidPDialog(){
        try {
            Class aClass = Class.forName("android.content.pm.PackageParser$Package");
            Constructor declaredConstructor = aClass.getDeclaredConstructor(String.class);
            declaredConstructor.setAccessible(true);
        } catch (Exception e) {
            e.printStackTrace();
        }
        try {
            Class cls = Class.forName("android.app.ActivityThread");
            Method declaredMethod = cls.getDeclaredMethod("currentActivityThread");
            declaredMethod.setAccessible(true);
            Object activityThread = declaredMethod.invoke(null);
            Field mHiddenApiWarningShown = cls.getDeclaredField("mHiddenApiWarningShown");
            mHiddenApiWarningShown.setAccessible(true);
            mHiddenApiWarningShown.setBoolean(activityThread, true);
        } catch (Exception e) {
            e.printStackTrace();
        }
    }
Updated on 四月 4, 2019
学习笔记 for Stanford University (cs193p): Developing iOS 11 Apps with Swift 4
stanford的课是真的好,不服不行。感谢字幕翻译。
Lecture 1: Introduction to iOS 11, Xcode 9 and Swift 4
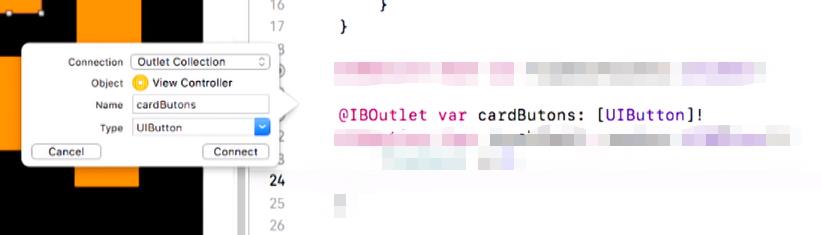
拖拽UI上的某个控件(比如UIButton)到代码,可以选择Outlet Collection,这样代码中就生成了一个UIButton的array,存放着被拖进来的控件,index顺序应该是按照拖进来的先后顺序。这样多个button调用同一个onclick方法,可以从array中获取该button的index从而知道是哪个button。
Lecture 2: MVC
struct和class的主要区别
1、结构体不能继承
2、结构体是值类型,类是引用类型。(当传递结构体的时候,是在拷贝它们)
Lecture 3: Swift Programming Language
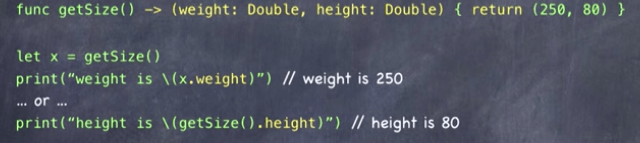
元组(Tuples)
元组像是一个迷你的没有方法、变量的结构体,在里面只有值。

元组可以作为函数的返回,当函数需要返回多个值的时候,挺方便的。
访问控制
- internal – swift默认的。可访问范围是:此app内或此framework内
- private – 在此object内
- private(set) – property readable outside this object, but not settable
- fileprivate – 文件内
- public – (for frameworks only)可以被framework外访问
- open – (for frameworks only)public并且framework外可以继承
assert
确保某个条件是成立的,如果不成立的话,程序就会崩溃,然后打印错误信息。当release后,assert会被忽略。
java也有assert,以前几乎从没用过。现在感觉这个挺有用的,确保assert的条件的正确性,在研发阶段发现问题。
Updated on 四月 4, 2019
解决Xcode编译iOS工程报Run custom shell script ‘Copy Pods Resources’ error
编译一pod工程报这错,解决方法是:
- Project’s Target
- Build Phases check for entries Check Pods Manifest.lock and Copy Pods Resources.
- Check option Run script only when installing if it has not selected.
Clean build & run again.
参考链接:
https://stackoverflow.com/questions/28080318/run-custom-shell-script-copy-pods-resources-error
Updated on 四月 4, 2019
Carthage安装又一坑
build报错,报什么没找到xxx/xx/carthage/xxx目录,好吧, 那就安装carthage吧。
brew install carthage

#结果报错

Warning: You are using OS X 10.13.
We do not provide support for this pre-release version.
You may encounter build failures or other breakage.
carthage: A full installation of Xcode.app 6.3 is required to compile this software.
Installing just the Command Line Tools is not sufficient.
Xcode can be installed from the App Store.
Error: An unsatisfied requirement failed this build.

#行吧,那就更新brew

brew update

#又报错
HEAD is now at cfe6b67 burp: update 1.4.28 bottle.
Error: Failure while executing: git pull --quiet origin refs/heads/master:refs/remotes/origin/master

#解决办法:

 ruby -e "$(curl -fsSL https://raw.githubusercontent.com/Homebrew/install/master/install)" < /dev/null 2> /dev/null


brew install carthage

#成功
参考:
Updated on 四月 4, 2019
CocoaPods踩过的坑
CocoaPods是专门为iOS工程提供第三方依赖库的管理工具,通过CocoaPods可以更方便地管理每个第三方库的版本
安装
Ruby使用macOS自带的Ruby就可以,不必安装。
sudo gem install cocoapods #安装cocoapods
我应该是很久以前安装过了,电脑上已经有cocoapods了。
使用
比如项目要依赖某个库,到那个库的github readme页面发现,上面写着使用pod ‘Pitchy’来install。
首先要在项目目录下生成Podlist文件,把pod ‘Pitchy’ 复制到文件中。
生成Podlist
terminal cd到项目路径,然后执行pod init,这样就在项目根目录下生成了Podlist文件。
编辑Podlist文件,将pod ‘Pitchy’ 复制到文件中。
安装依赖包
执行pod install安装依赖包
但是报错:
[!] Unable to add a source with url `https://github.com/CocoaPods/Specs.git` named `master`.
You can try adding it manually in `~/.cocoapods/repos` or via `pod repo add`.
上网查说是需要更新cocoapods
pod update --no-repo-update
结果报错 Abort trap: 6。
sudo gem uninstall cocoapods

sudo gem install cocoapods --pre


#结果又报错:

ERROR:  Could not find a valid gem 'cocoapods' (>= 0), here is why:
          Unable to download data from https://gems.ruby-china.org/ - bad response Not Found 404 (https://gems.ruby-china.org/specs.4.8.gz)

#添加源,并且把其他的源删除掉:

gem sources --add https://gems.ruby-china.com/ --remove https://rubygems.org/
https://gems.ruby-china.com/ added to sources
source https://rubygems.org/ not present in cache

#查看当前源
gem sources -l
*** CURRENT SOURCES ***

https://gems.ruby-china.org/
https://gems.ruby-china.com/

#继续删
gem sources --remove https://gems.ruby-china.org/
https://gems.ruby-china.org/ removed from sources

gem sources -l
*** CURRENT SOURCES ***

https://gems.ruby-china.com/

#再次执行
sudo gem install cocoapods --pre

#安装成功

#这时再执行install  (--verbose可能是打印log?)

pod install --verbose --no-repo-update

#成功
然后打开xcworkspace文件,就可以了。
Updated on 二月 21, 2019
迁移WordPress遇到的坑
今天把博客从境外迁回来,记录一下。
WordPress导出导入
在原博客wp-admin点击工具->导出,选择“所有内容”,点击“下载导出的文件”,生成了xml文件下载到本地。
在新博客wp-admin点击工具->导入,在WordPress一栏点击“现在安装”,然后选择文件导入。
结果发现导入失败,页面空白。网上查找原因,解决办法为:
yum -y install php-xml
重启Apache,重新选择文件上传,成功。
将原博客图片下载下来然后上传到新博客(这个不知道有没有更方便的方法)。
固定链接使用文章名导致404
当固定链接设为文章名时,如果下面提示:
如果您的.htaccess文件可写,我们即会自动帮您完成,但其目前不可写,所以以下是您需要加入您的.htaccess文件中的mod_rewrite规则。点击文本框并按CTRL + a来全选。
需要自行创建.htaccess文件,并将上述提示下方的文本框中内容复制到.htaccess文件中。重启Apache。
公网连接MariaDB报Host ‘xxx.xx.xxx.xxx’ is not allowed to connect to this MariaDB server
CREATE USER 'xxxuser'@'%' IDENTIFIED BY 'pw';
grant all privileges on wpdb.* to 'xxxuser'@'%';
Posted on 一月 10, 2019
Android WebView加载video标签在没有预览图的情况下显示预览图
解决办法就是在页面加载结束时,播放video并立即暂停,这样画面就停在了第一帧。
view.loadUrl("javascript:" +
                        "var video = document.getElementsByTagName(\"video\")[0];" +
                        "video.play();" +
                        "video.pause();");
Posted on 十二月 9, 2018
阿里云CentOS搭建FTP
#安装
yum install -y vsftpd

#设置开机启动
systemctl enable vsftpd.service

#启动
systemctl start vsftpd.service


#编辑配置文件
vim /etc/vsftpd/vsftpd.conf

#显示行号
:set number

#修改配置 12 行
anonymous_enable=NO

#修改配置 33 行
anon_mkdir_write_enable=YES

#修改配置48行
chown_uploads=YES

#修改配置72行
async_abor_enable=YES

#修改配置82行
ascii_upload_enable=YES

#修改配置83行
ascii_download_enable=YES

#修改配置86行
ftpd_banner=Welcome to blah FTP service.

#修改配置100行
chroot_local_user=YES

chroot_list_enable=NO

#当chroot_local_user=YES, chroot_list_enable=NO时,所有的用户均不能切换到其他目录。


#重启
systemctl restart vsftpd.service


#创建一个用户ftpuser,限制用户ftpuser只能通过 FTP 访问服务器,而不能直接登录服务器:
useradd ftpuser -s /sbin/nologin

#为用户 ftpuser 设置密码
passwd ftpuser


mkdir -p /var/ftp/pub

#   /var/ftp // 为主目录, 该目录只能读,不能写和执行
#   /var/ftp/pub // 文件具有读、写、执行权限

chmod a-w /var/ftp
chmod 777 -R /var/ftp/pub


#设置为用户的主目录:
usermod -d /var/ftp ftpuser
使用FileZilla登录到ftp报错,553,最终设置FileZilla传输设置里传输模式为主动,就能正常传输了。
参考
https://www.aliyun.com/jiaocheng/125929.html
https://www.cnblogs.com/leoxuan/p/8329998.html
Posted on 十二月 4, 2018
Spring Boot分离lib及性能调优
spring boot每次打包都比较大,50MB左右,上网查找了一下分离出lib包的方法。
<plugins>
    <plugin>
        <groupId>org.apache.maven.plugins</groupId>
        <artifactId>maven-jar-plugin</artifactId>
        <configuration>
            <archive>
                <manifest>
                    <addClasspath>true</addClasspath>
                    <classpathPrefix>lib/</classpathPrefix>
                    <mainClass>com.BootdoApplication</mainClass>
                </manifest>
            </archive>
            <outputDirectory>${project.build.directory}</outputDirectory>
        </configuration>
    </plugin>

    <plugin>
        <groupId>org.apache.maven.plugins</groupId>
        <artifactId>maven-dependency-plugin</artifactId>
        <executions>
            <execution>
                <id>copy-dependencies</id>
                <phase>package</phase>
                <goals>
                    <goal>copy-dependencies</goal>
                </goals>
                <configuration>
                    <outputDirectory>${project.build.directory}/lib</outputDirectory>
                    <overWriteReleases>false</overWriteReleases>
                    <overWriteSnapshots>false</overWriteSnapshots>
                    <overWriteIfNewer>true</overWriteIfNewer>
                </configuration>
            </execution>
        </executions>
    </plugin>
    <plugin>
        <groupId>org.springframework.boot</groupId>
        <artifactId>spring-boot-maven-plugin</artifactId>
        <configuration>
            <includes>
                <include>
                    <groupId>null</groupId>
                    <artifactId>null</artifactId>
                </include>
            </includes>
        </configuration>
        <executions>
            <execution>
                <goals>
                    <goal>repackage</goal>
                </goals>
                <configuration>
                </configuration>
            </execution>
        </executions>
    </plugin>
</plugins>
参考:
https://blog.csdn.net/u013305783/article/details/80576649
https://blog.csdn.net/qq_35959573/article/details/81001099
性能调优效果有限,首先是配置Tomcat
server:
  tomcat:
    uri-encoding: utf-8
    min-spare-threads: 3
    max-threads: 10
  connection-timeout: 5000
再有设置JVM参数:
-Xmx256m -Xms64m -Xss256k -XX:ParallelGCThreads=2 -Djava.compiler=NONE